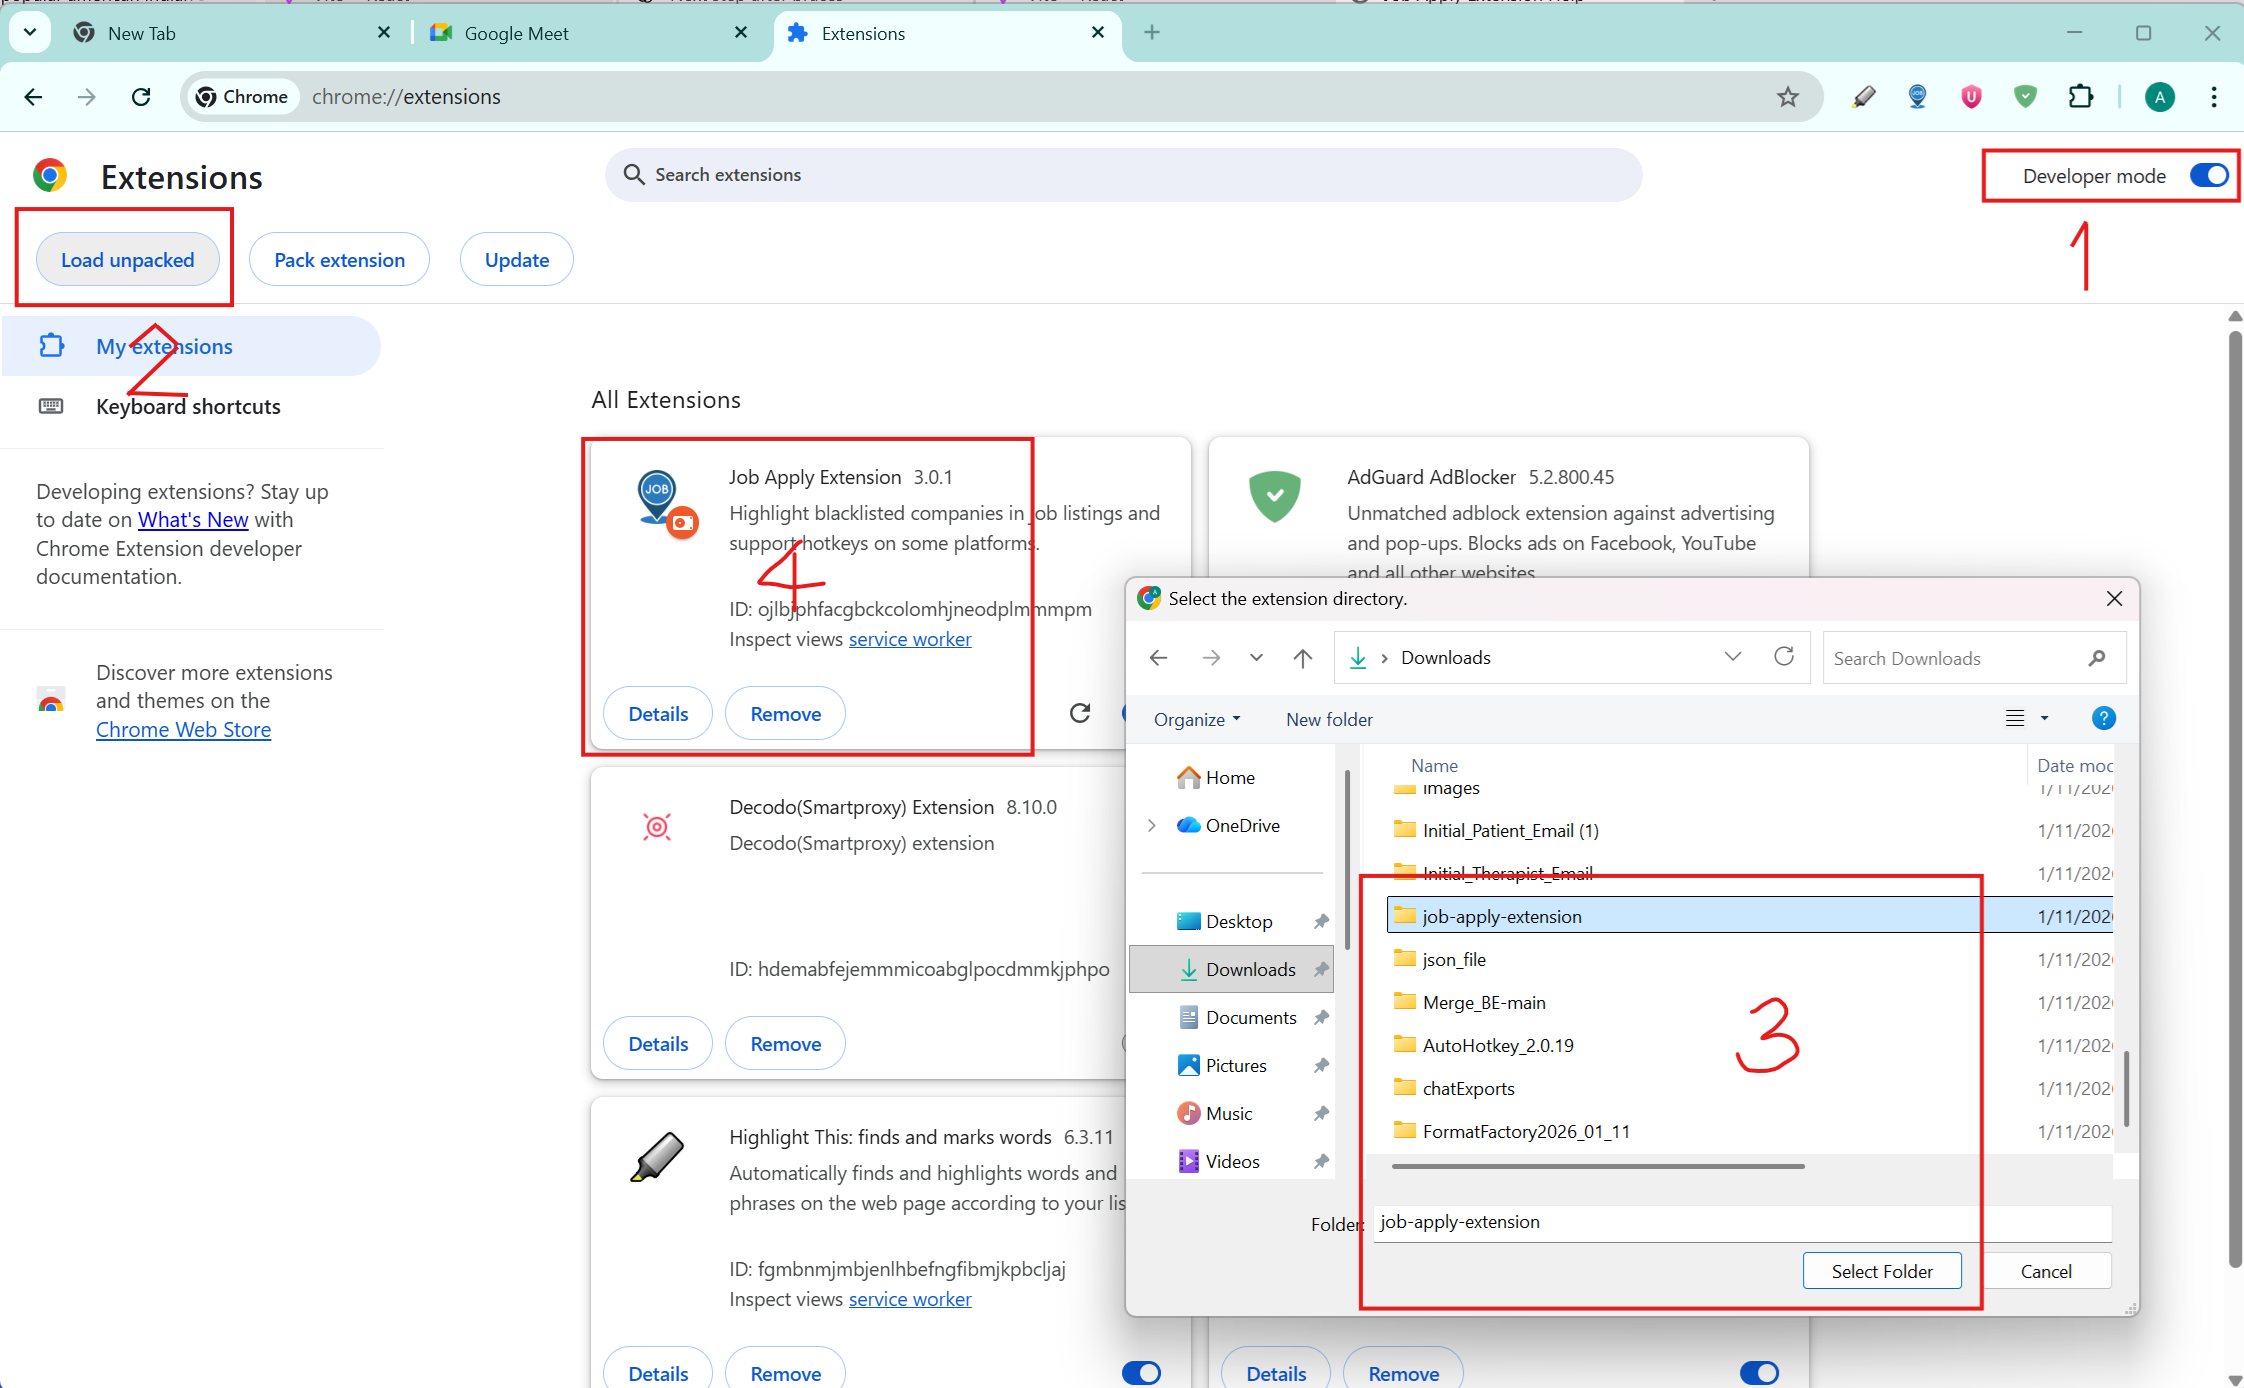
Install the extension in Developer mode in Chrome. Follow these steps:
Enable Developer mode (top-right toggle). This reveals developer controls.
Click "Load unpacked" (top-left) to open the folder picker.
Select the extension folder (e.g. job-apply-extension) and click Select Folder.
The extension will appear in the list — verify the name/ID. Click Details to review permissions and enable the Side panel if required.
Optional: open Keyboard shortcuts to assign a hotkey for the Side panel or other actions.
You can assign a hotkey to open the side panel (optional).
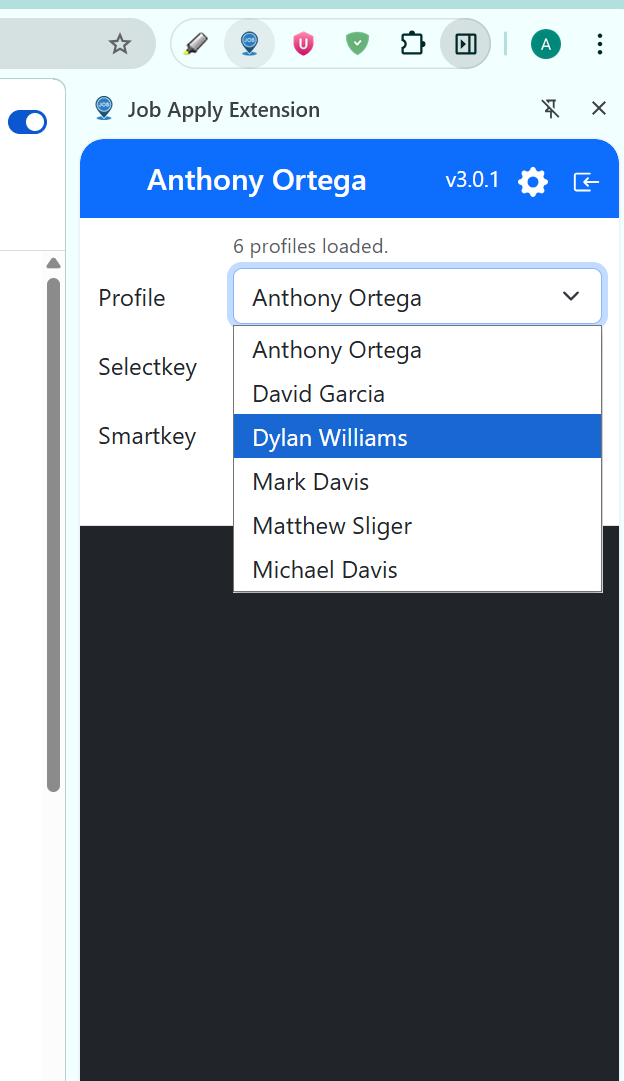
1.3 Set Your Profile
After opening the side panel, go to Settings and select the profile you were assigned from the dropdown.
If you see your profile name on the nav bar, the extension is installed correctly.
You can also customize hotkeys:
SelectKey: For manually selecting a job description on unsupported platforms
SmartKey: For quick one-click resume generation on supported platforms (Indeed, Builtin, etc.)
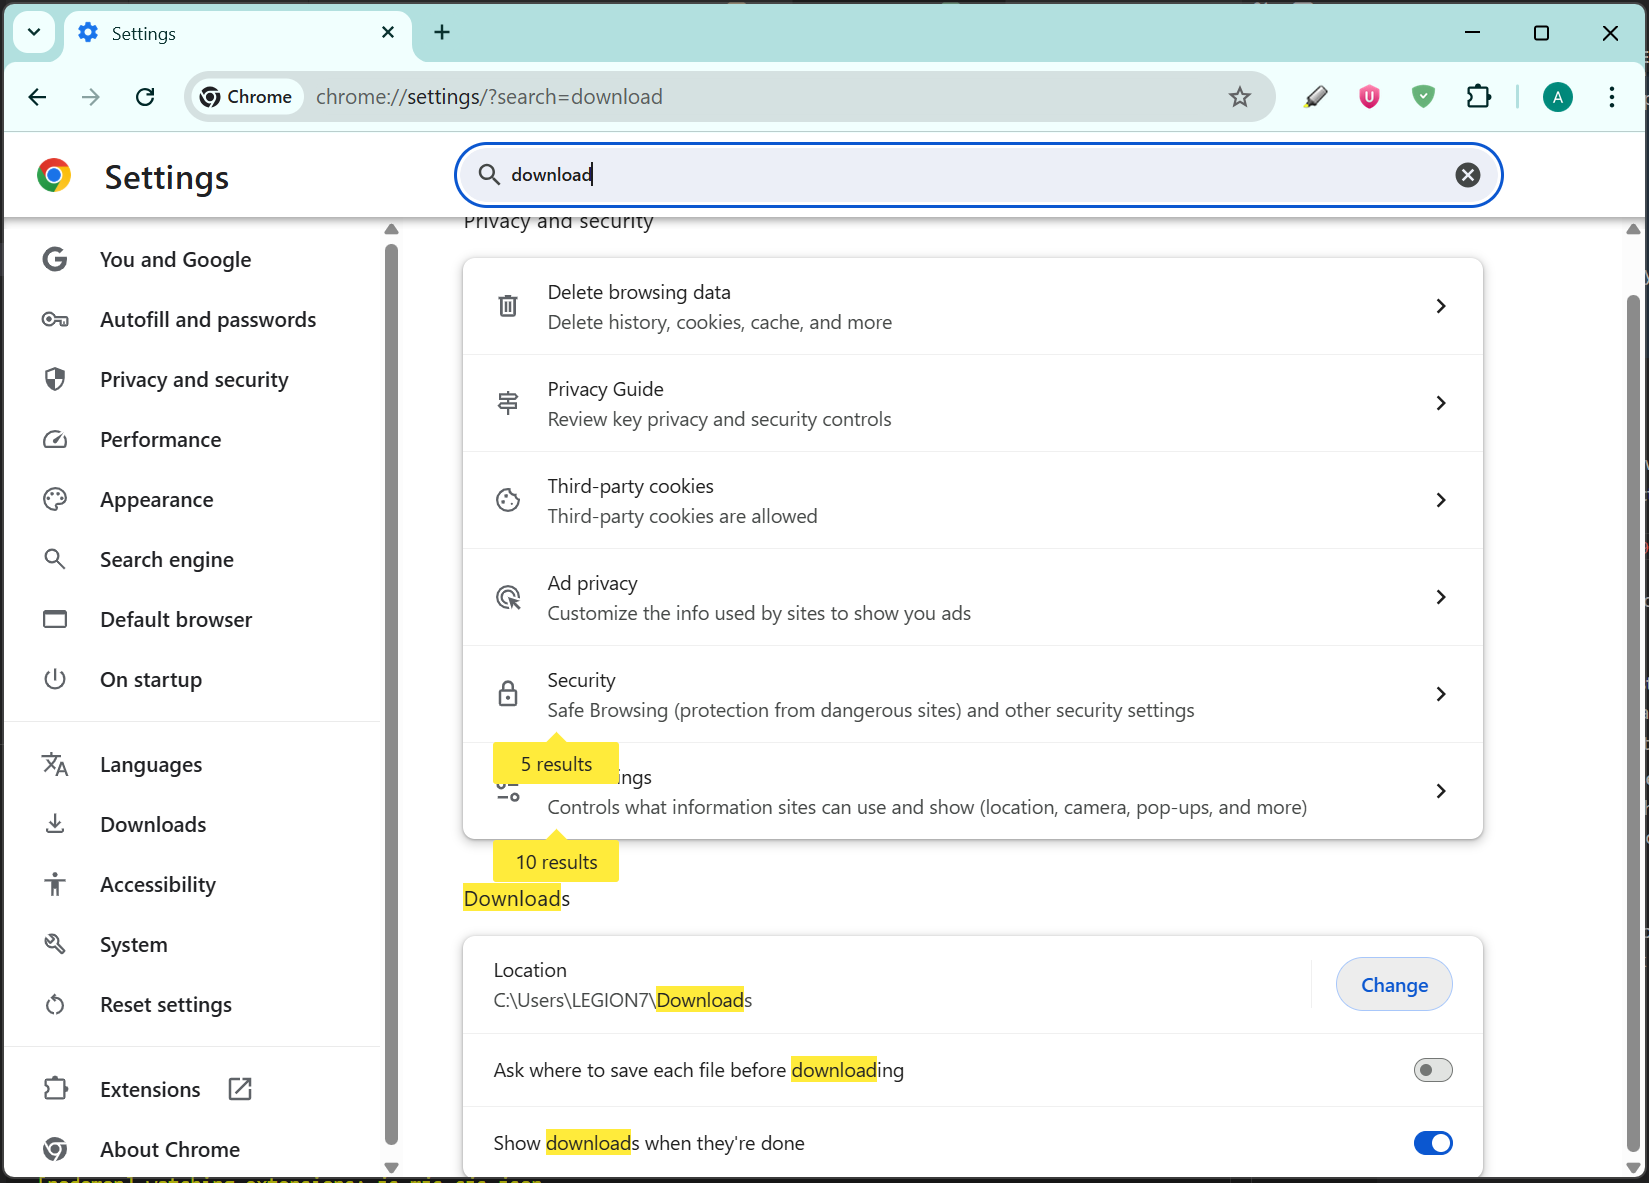
1.4 Download Folder Setup
Generated resumes are downloaded to your browser's default Downloads folder. For convenience, configure a dedicated folder in your browser settings so you can always find and re-upload resumes quickly.
Chapter 2 — How to Use the Extension
2.1 Company Highlighting on Job Platforms
When browsing job listings, a red-highlighted company name means you have already applied to that company within the last 100 days (the exact window is configurable per profile).
This highlighting works across multiple job platforms — not just Builtin — so you can avoid duplicate applications at a glance.
2.2 Recommended Filters on Job Platforms
Before you start applying, set the following filters on any job platform:
Filter
Value
Sort By
Recent Posted
Work Type
Fully Remote Only
Location
USA
Keywords
Software Developer (or any focused keyword)
Only apply to companies whose names are NOT highlighted in red (i.e., ones you have NOT recently applied to).
You are free to apply on any other job platforms where highlighting is not supported.
2.3 How to Apply — Step by Step
2a. Applying on a Supported Platform (SmartKey)
If you are on a job description page on a SmartKey-supported platform, the bubble will appear automatically next to the company name.
To request resume generation:
Type the SmartKey hotkey, or
Click the bubble directly.
2b. Applying on an Unsupported Platform (SelectKey)
If the job platform is not supported, you need to manually select the job description:
Select the entire job description — from the title to the end, including salary and all details.
Click "SelectKey".
2.4 Downloading Your Generated Resume
After a short delay, once the resume is successfully generated, the extension will prompt you to download the resume file.
Tip: Configure a specific download folder in your browser settings. This allows you to quickly locate and re-upload your resume during the application process.
2.5 Answering Technical Questions (Q/A Button)
While filling out an application form, if you encounter a technical question or a question related to your experience:
Click the Q/A button in the extension.
Paste the question from the form into the dialog.
Copy the generated answer back into the form field.
Note: Use this feature for technical questions and experience-related questions only — not for common/general questions. The answers are generated based on the job description and your resume.
2.6 Taking Screenshots as Evidence
Screenshot 1 — Filled Form
Once you believe you have filled out the application form completely, click the Camera button to save evidence. This takes a full-page screenshot and saves it to the server for admin review.
Screenshot 2 — Submission Confirmation
After reaching the final screen (e.g., "Thanks for applying" or "You successfully submitted the application"), take another screenshot. This proves you successfully applied to the job.
Important: When clicking the Camera or Q/A button, make sure you are clicking it on the correct tab (the one matching the application you are currently filling out) so it attaches to the right application record.
Chapter 3 — Additional Tips & Dashboard
3.1 Batch Resume Requests
Requesting multiple resumes at once saves time compared to doing them one by one.
Note: Some requests may fail due to disqualifying criteria, such as:
Certification requirements
Onsite-only roles
Schedule conflicts
Security clearance requirements
3.2 Dashboard Overview
Dashboard Page
View your daily and weekly application counts, and see a Pie Chart of which platforms you used.
Preferred platforms: Builtin.com, Hiring.cafe (others are also fine)
Billing (red number): Shows your weekly billing count, used for weekend payment calculation.
Applications Page
Search and view details of all your submitted applications.
Download the resume or job description for any application.
See how the application has interacted with emails received from the company.
Screenshots (Review) Page
Bidders can view their own submitted screenshots and delete ones taken by mistake. Approve and Reject actions are restricted to Admins (org admin or bidder manager).
View screenshots submitted by applicants.
Delete any of your own screenshots that were taken by mistake.
Approve or Reject screenshots for disqualified applications (Admin only) — a rejection will reduce the billing count.


.png)
.png)
.png)
.png)
.png)
.png)
.png)
.png)
.png)
.png)
.png)
.png)
.png)
.png)
.png)
.png)
.png)
.png)
.png)
.png)
.png)
.png)
.png)
.png)
.png)
.png)
.png)
.png)
.png)
.png)
.png)
.png)